Part I: How To Improve Your Front Squat By Fixing Your Front Rack Position
I will be discussing common mistakes, proper stretching to achieve a better front rack, different methods of the front rack position and what each method is used for or why you would choose one compared to another.
The Front Rack Position
This is a huge challenge that many people struggle with, and it is used in many movements for Weightlifting and CrossFit. This position is mainly used for movements such as the clean, push press, thruster, push jerk, power jerk, split jerk, and of course, the front squat. The most common issue I hear about the front rack position for any of the movements mentioned above is that it is uncomfortable, and it hurts the wrists. To be honest, I agree. I think the hardest thing to learn and to teach about the front rack position is how to get into a position, so it doesn’t hurt the wrists or feel uncomfortable. This takes more time than a specific cue that can be said to an athlete. Usually, the issues with the front rack position for most people is that they haven’t ever been in a good position to start with, so they don’t understand how it is supposed to feel. Often, after I demonstrate, and actively help the athlete get into a good front rack position, or even force them into it, do they then feel a difference in how the front rack is supposed to feel. Generally, there is still some discomfort as I push them into the range of motion needed, but I inform them of this before I start. After they understand what the front rack is supposed to feel like, they are amazed at how much more comfortable they feel. They then begin to tell me that they can now start working on that positioning to make their front squat better. Sometimes we must do a little bit more than just cue someone to do better. We actually have to walk over and put in some work to help them because as a coach, that is our job.
Setting Up Your Grip
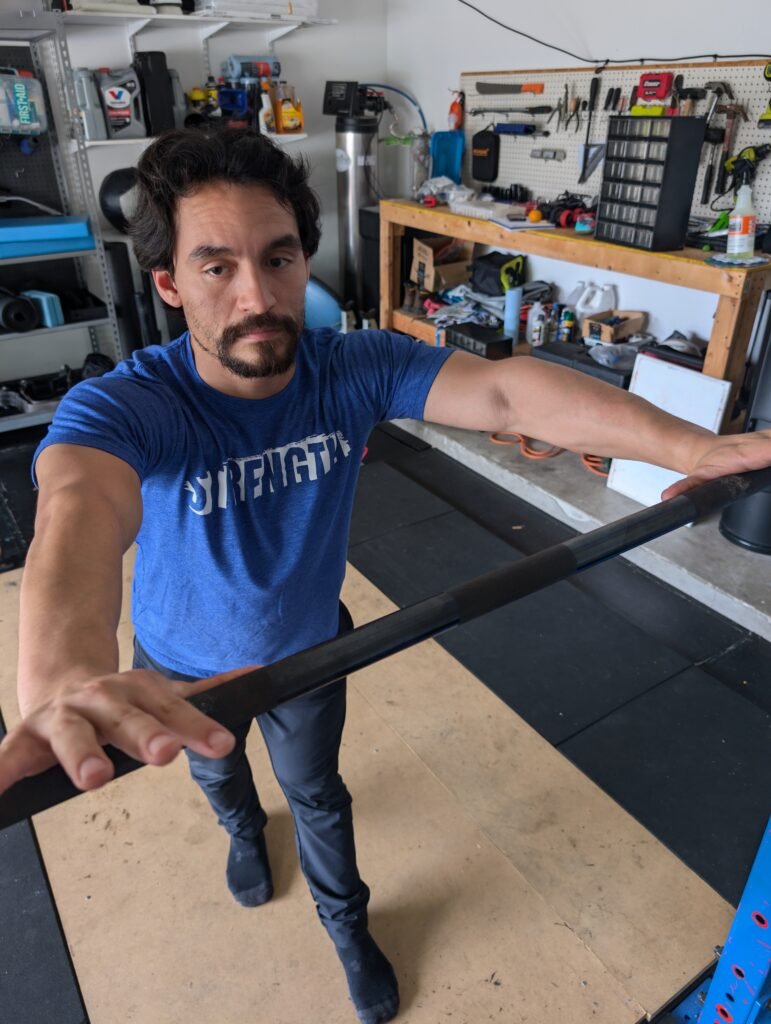
When setting up your grip, ideally, you want to place your hands in the same position you would if you were performing a clean or an overhead movement. Most people will say that your grip is about right outside your shoulders, which is a very fundamental cue, but it can work. I like to teach a different way. The place where the knurling of the bar meets the smooth and rough is a great place to start because it is the easiest to identify on any barbell. When you find that part of the barbell, you want to use another measurement tool that we always carry with us… your thumbs. Your thumbs can be used to measure out the distance needed when setting up into a front rack position. The terms I use when setting up my hand position on the barbell for about every movement, other than the snatch, is “half thumb” or “full thumb”. In an unlikely situation, there are some bars where the knurling is a little closer in towards the smooth part of the bar so be aware that your hand position might have to change, depending on how the bar is made. A good quality bar and most bars will always have the knurling in the position that I am referring to in this article.
Now, the grip I have most athletes set up with is going to be “half-thumb”. This means that half of your thumb will be set up inside of the knurling and half will be along the knurling. The quickest way I find this area is by lining up the crease of my thumb, where it flexes/bends, to the marker where the smooth and rough part of the bar touch. Most people are going to set up with a “full-thumb” grip because that is what they were taught, but during my years of coaching I have found that most people are able to get into a stronger position with the half-thumb grip. However, in a lot of situations where the athlete is above average height then I adjust their grip to that full-thumb’s length. These are just the 2 most common grips I use when coaching because they get athletes in better positions quickly. These are not the only grips you can use. Once you have gotten enough experience with lifting and want to try out a little bit closer or wider grip then make very small adjustments from there. Like inches or even centimeters. Yes, not big changes.
Let’s talk about how the distances of your grip can affect your front rack position.
The farther away your hands are, the less control you have with the bar, but the more the bar will sit on your collarbone and shoulders and apply less pressure on your wrists and shoulders. This is usually an acceptable start for most athletes, mostly males learning to front squat. Female athletes tend to be able to set up in a great front rack much more easily than males. Most athletes prefer this wider grip because it’s easier to get into and doesn’t cause as much pain as attempting the closer grip. Although, this wider grip is easier for athletes to start with, eventually they are going to be limited on their front squat due to not being able to involve the upper back to keep them upright with a heavier load. Understand that with a wider grip on the bar you are not able to engage your upper back muscles as much as if you had a closer grip. In the long run, the most progressing grip is going to be the closer grip. It will take more work to get into the “half-thumb” grip on a front squat, but it is likely the grip that will yield the most progress. Find a grip where you are slightly uncomfortable, but you feel like you have the most control, and continue to work on wrist, lat, and shoulder mobility. This is how you are going to break the plateau you’ve been having on front squat.
The Front Rack
Warm Up! Warm up! Warm up!
The best way to get into a proper front rack position is going to be to warm up and get proper mobility in the wrists, lats, and shoulders. If you are already pretty mobile in those areas, then you want to warm up your upper back and core. For your upper back you want to perform some pulling movements and scapular work. For your core you want to hit some quick bird dogs, dead bugs, or side planks to be ready for bearing heavy load.
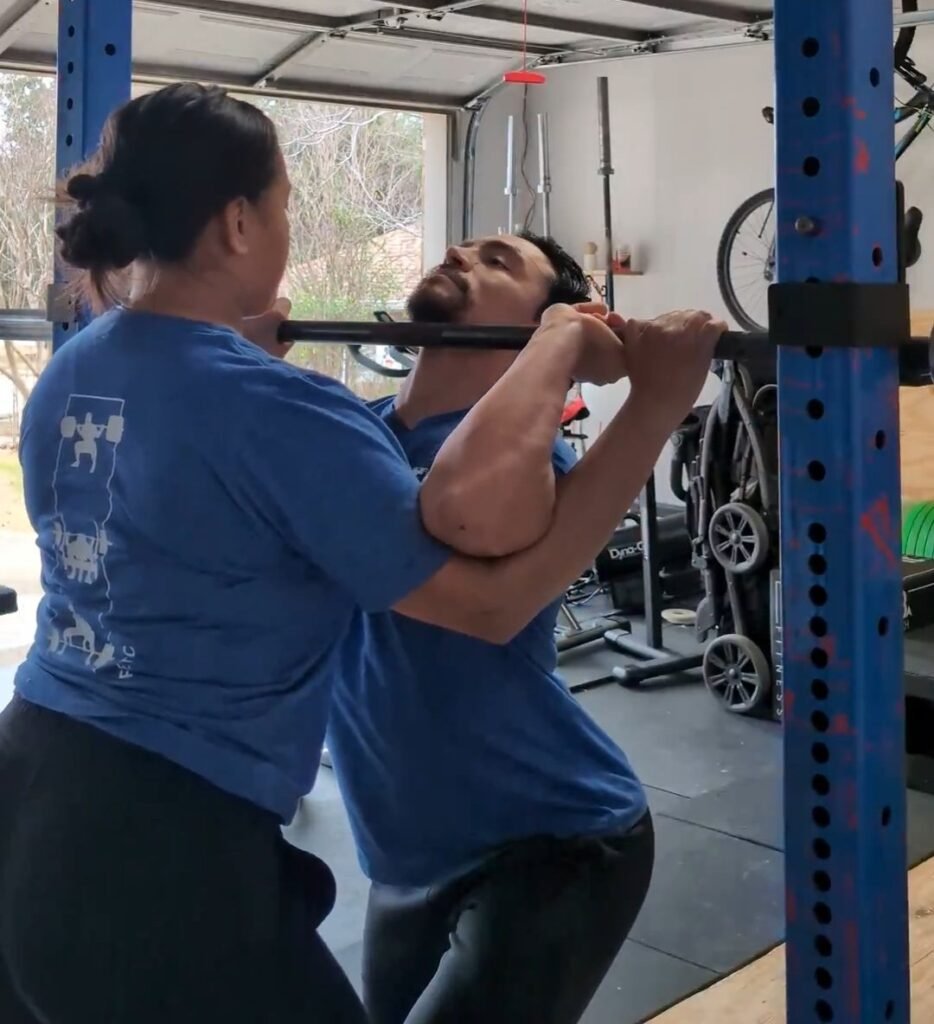
The Full-Grip
As for the proper front rack position, you want to use what I am calling the “full-grip” method. This is going to give you the most control of the barbell and the best advantage to improving your front squat. You want to have your hands a little outside your shoulders and for the bar to rest on your collarbone and shoulders. Set up with a full-grip on the bar and then start by pulling yourself into the bar by using your back muscles. Wherever the bar lands, you then push your elbows forward and up some more to get the bar into the correct position, which is usually as far up on your collarbone as possible without cutting off your air to breathe. While doing this, you must still make sure that your hands are fully gripped onto the bar. You can make a few small adjustments while the bar is still in the rack and resting on your collarbone so that it is in a perfect position to not put too much pressure on the collarbone and to not constrict any arteries. You don’t want to position the bar too high where it rests on an artery because it’s a ticking time bomb before it causes you to pass out, which is normally after you stand up from a front squat. I have almost done that before. I missed the rack and all the weights slid off one side. Not a proud moment.
You might have seen people stand up from a clean, set up for a jerk, and then pass out. This is usually because they have the bar resting in the wrong spot. If you position the bar too low, then you won’t be able to get enough height with the elbows or a great front rack. The bar will put excessive pressure on your wrists and elbows eventually causing your wrists or elbows to have pain. Then, you might blame front squats when, in reality, it’s your front rack position. If you position the bar too high, it can lead to some nasty marks on your collarbone and limit your air. This is where you need to re-think your warm-up and set-up for front squats.
Now that you have your elbows as far forward and up as possible and the bar resting on your collarbone and shoulders, you want to ensure that you are keeping your whole hand gripped when you unrack the bar going into the front squat. As you are performing each rep, you are constantly focused on keeping a full grip and driving the chest and elbows up at the same time you squat the bar up. This full grip is going to give you the most control of the bar that you can have so if your posture starts to round forward you can fight your torso upright by squeezing the bar and actively pushing your elbows up.
When thinking about your hand placement, the closer you grip the more control you’ll have with the bar and the more weight that will be placed on your hands and wrists. This is not a bad thing when you can get your wrists warmed up enough to extend back in a comfortable position because then you will have great control of the bar and feel comfortable because more of the bar is resting on your collarbone and shoulders. This is not so great if your mobility is lacking and all the pressure of the weight is resting on your wrist and elbows. This does not feel good at all, and you have some mobility to work on.
Your set-up to your front squat is the most critical step to achieving a good front rack position. You want to actively pull yourself into the bar with a full grip with your shoulder blades retracting. You want to elevate your chest and elbows as much as possible while keeping your core braced and ribcage down. There will be extension of the spine. As long as you have tension in your abdomen and your back feels safe then I wouldn’t worry too much about the extension in your spine. In weightlifting you are going to have that curvature of the spine, that’s just the sport! After pushing your elbows up as far as you can and keeping your back tight, you now have a strong front rack position that is ready to handle whatever weight is put on the bar.
Now, let’s talk about all the other front rack positions you will see. I will call them “the relaxed-grip” and “the arms-crossed” methods. I will also talk about the Frankenstein or Zombie Front Squat that you might see occasionally.
The Relaxed Grip
The first and most popular front rack method is when the bar is set on the collar bone, like it should be, but the hands/wrists are relaxed or extended to help with the elbows staying elevated and applying less pressure on the hands/wrists. This is probably the most common adjustment made in order to allow the athlete to still have a great front rack and feel strong. This method is favored because it immediately reduces the pain felt on the wrists. I would definitely want to do a method that doesn’t cause me pain versus one where I feel pain right away. However, even though there is immediate relief when you perform the relaxed-grip, you don’t want to settle with this method if you are looking to improve your front squat even more. Overall, the best method is going to be the full-grip method, you are just going to have to put in some more work to make it comfortable. I prefer this relaxed-grip method as a variation first, if necessary, before trying any other front rack positions. This is not a “bad” front rack position and it might be optimal for some athletes due to the amount of time it would take to gain enough mobility to achieve the full-grip front rack. The most common mistakes I see with this method is that most athletes don’t create enough tension pulling themselves into the bar with their upper back and only holding on to the bar with 2 fingers. When you don’t create enough tension into the bar initially then you will have a weaker posture holding the bar. This weak posture will force the bar to slide down, making it harder to keep an upright torso, so a miss is prone to happen.
When an athlete is only having 2 fingers that are holding the bar, there is even less control of the bar. Holding the bar with 2 fingers instead of 3 will make the elbows cave in, likely causing the upper back to round, the bar to slip down, and then again, producing a missed front squat. If you are going to have an athlete perform this front rack, make sure to tell them to keep a full grip on the bar as long and as best as possible while the bar is on the rack. Then tell them to slowly allow the fingers to disconnect from the bar until there are 3 fingers on the bar. The index, the middle, and the ring finger. This will give a little bit more control and help to keep the elbows forward and up. This is the best middle ground when performing this front rack method. Now you have a stronger and more upright front rack position without putting too much pressure on the wrists and hands.
Next is the “Arms-Crossed” method.
The Arms-Crossed
The next method I see a lot is the arms-crossed front rack position. This is the next position to try if the athlete is still complaining about their wrists. This method gives even less control of the barbell compared to the relaxed-grip front rack method, but it is one to at least try if you don’t have straps. I will talk about the straps later.
In this front rack, the athlete will place the bar on the collar bone and then cross their arms over the bar to keep the chest upright and for a place to put their hands. The athlete will then try to maintain this position while front squatting. Although I have seen some athletes hit some heavy weight with this method, I don’t consider it to be a long-term option. This is kind of the last-resort method in my book if you don’t have any time to help the athlete because you have 20 other athletes you are coaching.
If you are going to tell an athlete to use this method, you want to make sure they are set up as strong as possible before they go into their front squat. The best way to approach this is going to be as if you are performing the relaxed-grip method and then letting go completely of the bar and crossing your arms. As with any front rack method you want to create as much tension with the bar and your upper back as possible to give yourself the best advantage in keeping your chest upright and the bar sitting on your collarbone throughout the whole set. The tighter and upright you can be the better chance you have of never missing a front squat due to your front rack. The moment you lose your upright position in your upper back and round forward, the more pressure the bar will place on your shoulders, forcing the bar to slide down and fall to the ground. Don’t try and fight the bar up with your shoulders, just let it go. The more you try and keep the bar staying on your shoulders with the arms-crossed method, the more risk of injury you have on your shoulders. If you hurt your shoulders, now you have another problem to deal with. Sometimes missing a lift is better than fighting to complete it. This idea should be considered with all lifts.
Every set-up for the front squat should look like you are performing the full-grip front rack method and then making the adjustments necessary to get into the next regression of the front rack.
Finally, the Frankenstein or Zombie Front Squat.
Frankenstein or Zombie Front Squat
This method is mainly used for correction or a more challenging variation for the purpose of variety. To set-up for the Frankenstein or Zombie Front Squat, you want to set up with the full-grip method or any of the other regressed methods mentioned above and then let go of the bar completely, allowing the bar to rest only on your collarbone, and extending your arms out in front of you. This is the most challenging method of front squat because you have no control over the bar at all, so if you round forward even the slightest, that bar will roll, or put so much tension on your front delts that you will let the bar roll off of you and hit the ground or safety racks, whichever you decided on. Again, just let it go and don’t risk the injury.
The key with this type of front squat is that you have to set up right to have the best opportunity at making all your squats.
This is why creating that tension into the bar is critical to any front rack.
People like to use this type of front squat as a teaching tool so the athlete can understand that they have to keep their posture upright in order to complete the front squats, no matter how strong their legs are. This is a great teaching tool when taught correctly. It’s all about position, position, position!
Now, let’s bring back the mention of straps. Next, I will be discussing my favorite modification to front squats.
The #1 Modification
While there are multiple ways to set up with front squat, there is still one modification you can make to benefit an athlete for the short-term or long-term, if, as their coach, you deem it unnecessary to spend more time trying to have the athlete achieve a better front rack position.
One of my go-to and most favorite modifications is using straps around the barbell to ensure that the athlete will be able to get the bar on their collar bone while keeping their chest upright and their elbows forward and up. I’ve also seen athletes use small towels to wrap around the bar and it worked just as well. This will give the athlete a much stronger front rack position to help them attempt the weight they need for developing their front squat.
The key thing about this modification is to make sure the straps are set up at shoulder width and not too wide. If the straps are set up too wide, the athlete will have a much harder time keeping the elbows up while squatting. Once the straps are set up in the correct position, you want to make them extra tight on the bar. Have the athlete grip the straps as close to the bar as possible and then, while setting up into the front rack, keep a strong grip on the straps and focus on continuously pushing the elbows forward and up. The more the elbows flare out while holding the straps, the more likely the straps will slip inwards, causing the upper back to round forward, and then resulting in the bar slipping down and missing the front squat. If the athlete pays attention to gripping the straps close to the bar and tightly, placing the bar on their collarbone, driving the elbows up, and keeping the elbows in-line with the shoulders, they will have no issue with this modification. If the athlete makes any of the mistakes listed below, they are not going to like this modification and then blame you, as if you don’t know what you are talking about.
You gotta love those athletes…
- Elbows flare out
- Straps set up too wide
- Gripping the straps too high, allowing slack
- Positioning the bar lower than the collarbone
I love this modification because it’s easy to teach and quick to learn. It will give the athlete more confidence in their front squats and create a desire to front squat more.
These are the top 3 pairs of straps I recommend for any type of lifting and these will work for setting up that modified front squat position as well.
A Better Way To Set Up
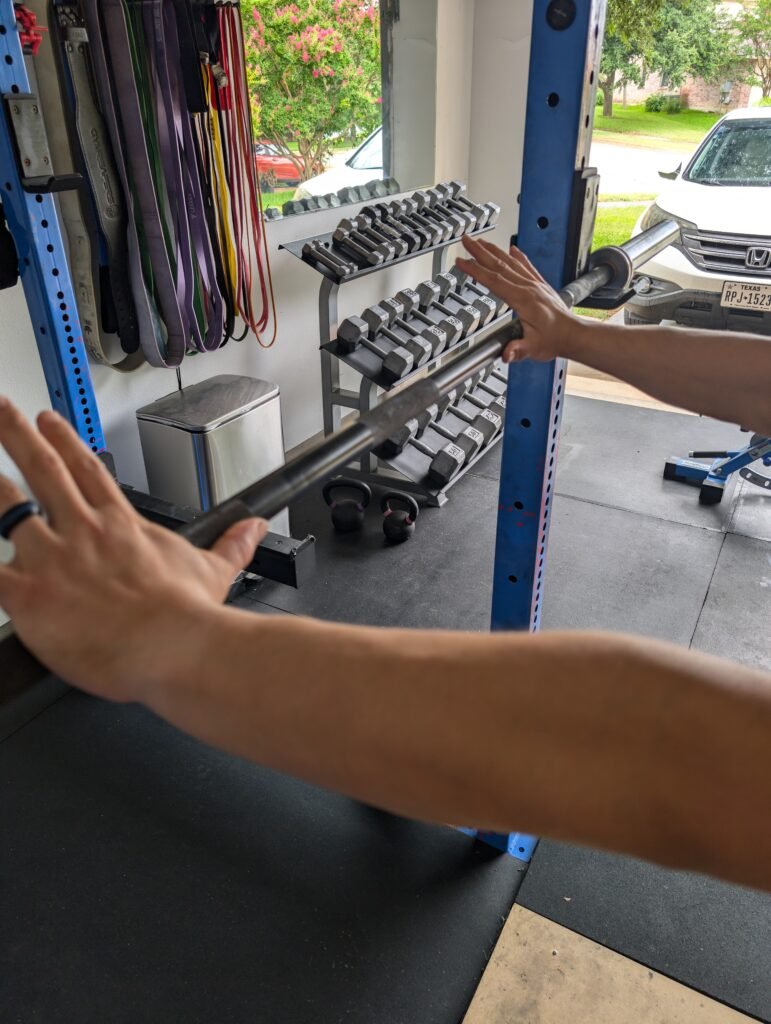
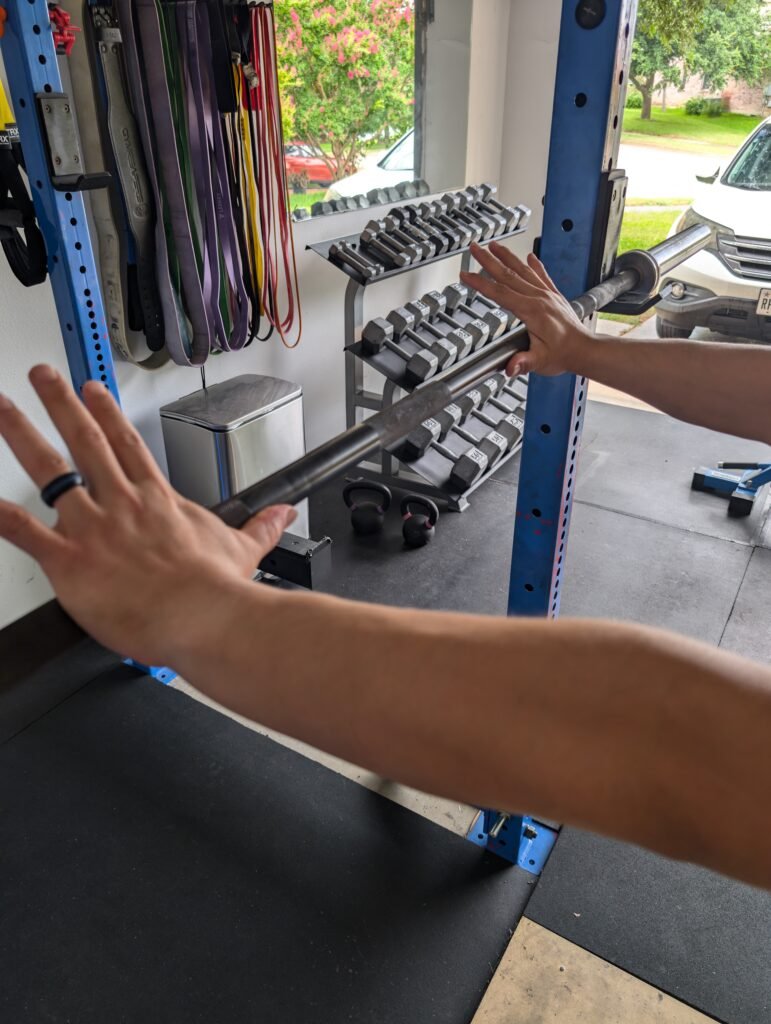
A great way to set up underneath the barbell to help with your front rack position is to first, hold a strong grip on the bar, then squat under the bar as if you are trying to limbo underneath it, throw your elbows forward under the barbell. After pushing your elbows as far forward under the barbell as possible, you will then slowly stand up so your collar bone can make contact with the barbell. Try your best to keep your elbows at the same height they were at when you were trying limbo, easier said than done. The elbows are most likely going to drop a little bit, but just keep trying to force them up. Just by doing this, you will be actively stretching your lats and shoulders. Continue to do this until you feel more mobile to go into your first warm-up set of front squats.
Check out this video for a good demonstration from Dr. Quinn Henoch.
Stretching And Mobility
The list below are some great Lat and front rack stretches before getting into a front squat. The order is from least intense to most intense in terms of the stretch you might feel. If you are already pretty mobile, you can skip this all together or start with the more intense stretches. The more mobile you can start yourself with, the quicker you can get into your sets of front squat and not spend 10-15 minutes warming up. No one wants to spend 2.5+ hours at the gym, with a majority of that time warming up. Work on your mobility now, so you don’t have to spend so much time on it later.
Pick and choose 2-3 of these stretches and spend about 15-30 seconds on each one. You can complete anywhere from 1-3 sets or however many it takes to feel comfortable in that front rack position. I like to perform 1 set of a less intense stretch before touching the bar and then pick a more intense one while warming up to my working weight. This way I can combine my warm-up of stretching and my warm-up of front squats to more quickly get to the weight I need to perform for the day.
Single Arm Lat Stretch On Wall/Rack
PVC Prayer Stretch
Barbell Front Rack Stretch
BARBELL BEHIND THE NECK LAT STRETCH
Barbell Behind The Neck Lat Stretch w/ Resistance
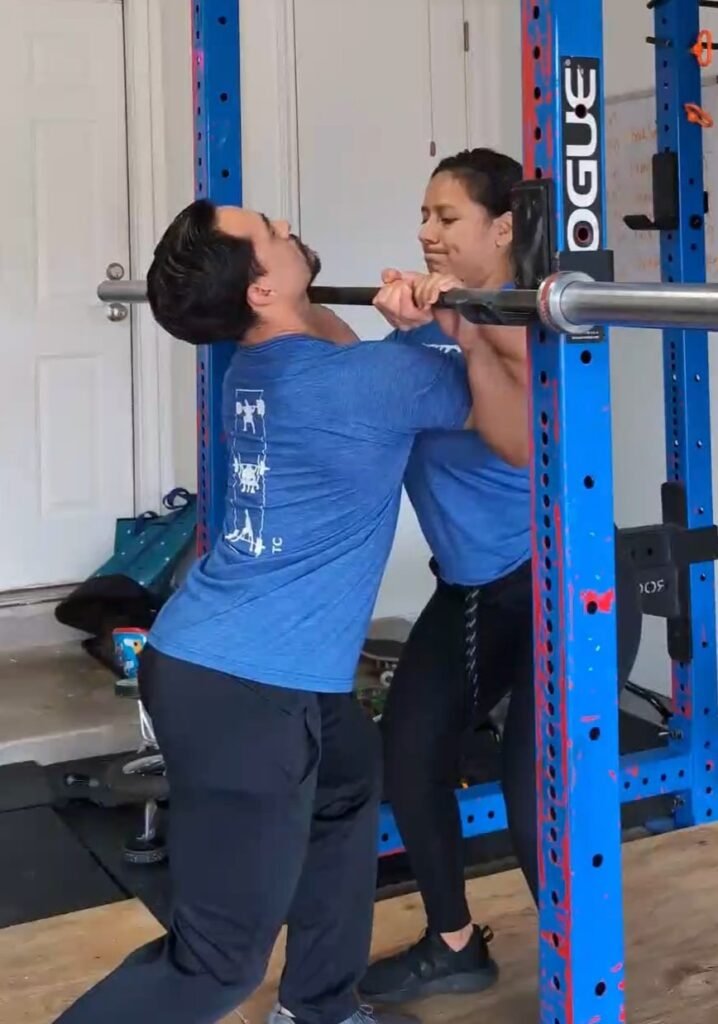
Front Rack Stretch Into Front Squat
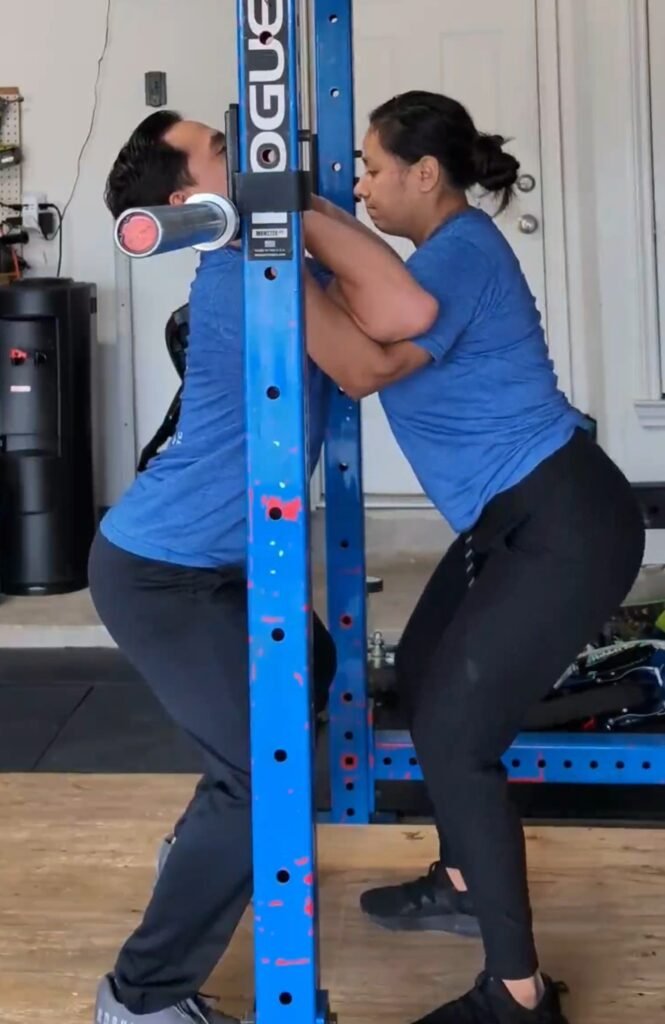
Barbell Partner Front Rack Stretch